Transform Your Halloween With A DIY 3 Blind Mice Costume
Creating a memorable costume for Halloween doesn’t have to break the bank or involve a last-minute store run. With the "3 blind mice costume diy" trend taking the crafting world by storm, you can make a stunning and unique ensemble that’s perfect for parties, school plays, or family fun. This guide will walk you through the process step by step, ensuring your DIY creation stands out while staying true to the classic nursery rhyme theme. Whether you’re a beginner crafter or an experienced seamstress, this project is both fun and rewarding.
DIY costumes have gained immense popularity as they allow for personalization and creativity, making every piece truly one-of-a-kind. By choosing the "3 blind mice costume diy" route, you’re not only saving money but also adding a personal touch to your ensemble. This costume idea is versatile, catering to individuals of all ages and skill levels. From selecting the right materials to assembling the final product, we’ll provide you with all the tools and tips necessary for success.
The charm of crafting your own costume lies in its ability to reflect your personality and style. The "3 blind mice costume diy" concept offers endless possibilities for customization, allowing you to incorporate your favorite colors, fabrics, and embellishments. This article will delve into the specifics of designing and constructing your costume, ensuring it’s both visually appealing and comfortable to wear. Let’s dive into the world of DIY crafting and bring this iconic trio to life!
Read also:Exploring The Girthmaster Miaz Video A Comprehensive Guide
Why Should You Choose a 3 Blind Mice Costume DIY?
With so many costume options available, why should you opt for a DIY version of the 3 blind mice? First, it’s an excellent way to express your creativity and showcase your skills. Second, crafting your own costume ensures uniqueness, as no two DIY projects are exactly alike. Lastly, it’s an economical choice that allows you to reuse materials you already have at home. In this section, we’ll explore the benefits of choosing a DIY approach over store-bought alternatives.
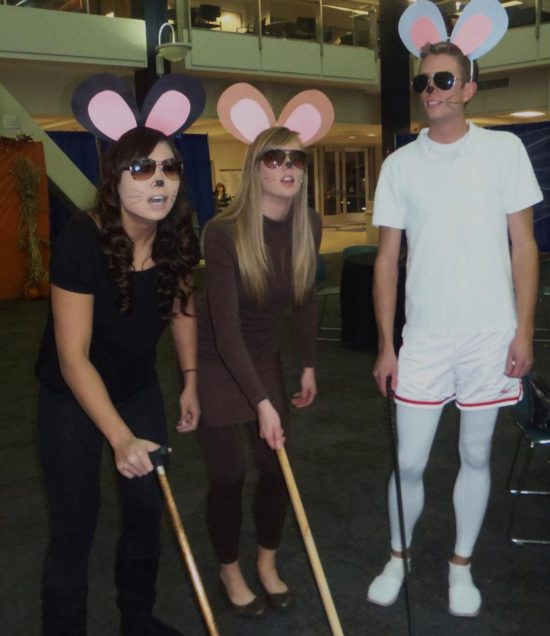
What Materials Do You Need for a 3 Blind Mice Costume DIY?
Before you begin your crafting journey, it’s essential to gather all the necessary materials. For the "3 blind mice costume diy," you’ll need fabric in shades of gray, white, and black, as well as felt for the ears and tails. Additional items include safety pins, elastic bands, and a hot glue gun for attaching accessories. A sewing machine is helpful but not mandatory, as hand stitching can achieve the same results with patience and precision.
How Can You Customize Your 3 Blind Mice Costume DIY?
Personalization is the key to making your costume stand out. Consider adding unique touches such as sequins, ribbons, or patches to enhance the visual appeal. If you’re crafting for children, ensure the costume is lightweight and breathable for comfort. Adults can experiment with more elaborate designs, incorporating elements like faux fur or LED lights for an extra touch of flair. The possibilities are endless, limited only by your imagination.
What Are the Steps to Assemble a 3 Blind Mice Costume?
Now that you have your materials ready, it’s time to dive into the assembly process. Below is a detailed breakdown of the steps involved in creating your "3 blind mice costume diy":
- Step 1: Measure and cut your fabric according to the desired size.
- Step 2: Sew the main body of the costume, leaving openings for the head, arms, and legs.
- Step 3: Create the mouse ears using felt and attach them securely to a headband.
- Step 4: Add the tail by attaching a long piece of fabric or yarn to the back of the costume.
Can You Simplify the Process for Beginners?
Absolute beginners may feel overwhelmed by the idea of sewing an entire costume. Fortunately, there are ways to simplify the process. For instance, you can use no-sew techniques such as fabric glue or safety pins to hold pieces together. Pre-made tunics or sweatshirts can serve as the base, with additional elements like ears and tails attached for authenticity. This approach saves time while still delivering a convincing "3 blind mice costume diy" look.
Where Can You Find Inspiration for Your 3 Blind Mice Costume DIY?
For inspiration, look no further than online crafting communities, Pinterest boards, or YouTube tutorials. These platforms offer a wealth of ideas and step-by-step guides tailored to various skill levels. Additionally, studying the original nursery rhyme illustrations can provide valuable insights into the traditional appearance of the mice, helping you stay true to the classic aesthetic.
Read also:Pili Hunters Shark Tank The Journey Of A Unique Snack Brand
Tips for Making Your Costume Comfortable and Durable
While aesthetics are important, comfort and durability should not be overlooked. Ensure the fabric you choose is soft and breathable, especially if the costume will be worn for extended periods. Reinforce stress points such as seams and attachments to prevent tearing or detachment during use. Proper fitting is also crucial, so take accurate measurements before cutting your fabric.
How Can You Incorporate Safety Features into Your 3 Blind Mice Costume DIY?
Safety should always be a priority when crafting costumes, particularly for children. Use non-toxic materials and avoid small parts that could pose choking hazards. If incorporating lights or electronic components, ensure they are properly insulated and battery-operated. Visibility is another concern, so consider adding reflective strips or bright colors to make the costume easily noticeable in low-light conditions.
What Are the Best Practices for Storing Your 3 Blind Mice Costume?
After investing time and effort into your "3 blind mice costume diy," it’s important to store it properly to maintain its quality. Fold the costume neatly and place it in a breathable storage bag to protect it from dust and moisture. Avoid hanging heavy costumes, as this can cause stretching or distortion over time. If the costume includes delicate elements like sequins or fur, handle them with care during storage and transportation.
How Can You Reuse or Repurpose Your 3 Blind Mice Costume DIY?
Once the Halloween season is over, consider repurposing your costume for future events or projects. The "3 blind mice costume diy" can easily be transformed into other animal-themed ensembles with minor modifications. For example, swapping the ears and tail can turn your mouse into a rabbit or squirrel. Alternatively, donate the costume to local theaters or schools for use in plays and performances.
Conclusion: Embrace the Fun of DIY Costumes
Creating a "3 blind mice costume diy" is more than just a craft project—it’s an opportunity to unleash your creativity and enjoy the process. By following the tips and techniques outlined in this guide, you’ll be well on your way to crafting a stunning and unique costume that’s sure to impress. Remember, the key to success lies in preparation, patience, and personalization. So gather your materials, roll up your sleeves, and let the crafting begin!
Table of Contents
- Why Should You Choose a 3 Blind Mice Costume DIY?
- What Materials Do You Need for a 3 Blind Mice Costume DIY?
- How Can You Customize Your 3 Blind Mice Costume DIY?
- What Are the Steps to Assemble a 3 Blind Mice Costume?
- Can You Simplify the Process for Beginners?
- Where Can You Find Inspiration for Your 3 Blind Mice Costume DIY?
- Tips for Making Your Costume Comfortable and Durable
- How Can You Incorporate Safety Features into Your 3 Blind Mice Costume DIY?
- What Are the Best Practices for Storing Your 3 Blind Mice Costume?
- How Can You Reuse or Repurpose Your 3 Blind Mice Costume DIY?
Article Recommendations